Uma válvula de gaveta pingando é mais do que apenas um incômodo. Ela sinaliza que seu encanamento precisa de atenção. O gotejamento constante desperdiça água. Se ignorado, pode causar danos maiores.
A boa notícia? Muitas vezes, você mesmo pode consertar uma válvula de gaveta. A maioria dos vazamentos vem de dois pontos: o haste da válvula embaixo da alça ou na vedação ao redor do corpo da válvula.
Este guia fornece instruções claras para solucionar esses problemas comuns. Também ajudaremos você a decidir quando um reparo simples funciona e quando a substituição completa da válvula de gaveta é a opção mais inteligente.
Eis o que abordaremos:
Antes de manusear qualquer ferramenta, a segurança vem em primeiro lugar. Trabalhar com tubulações de água sem os devidos cuidados pode causar inundações, danos materiais e ferimentos.
AVISO: Feche o registro de água.
- Localize a válvula principal de fechamento de água da sua casa. Geralmente, ela fica onde o cano de água entra na residência. Verifique o porão, o espaço rastejante ou o armário de serviço.
- Gire a alavanca no sentido horário até que esteja completamente fechada. Para alavancas de controle remoto, gire-a perpendicularmente ao tubo.
- Certifique-se de que a água esteja desligada. Abra uma torneira no nível mais baixo da sua casa, como a pia do porão. Deixe a água correr até parar completamente. Isso esvazia o encanamento e alivia a pressão.
Ter as ferramentas e equipamentos certos desde o início torna o trabalho mais tranquilo e seguro.
| Ferramenta/Engrenagem | Propósito |
|---|---|
| Chaves ajustáveis (x2) | Um para apertar as porcas, o outro para manter o corpo da válvula firme. |
| Alicate de junta deslizante | Útil para segurar a alça ou outros componentes. |
| Embalador, puxador ou selecionador | Para remover material de embalagem antigo e compactado. |
| Escova de aço | Para limpar roscas e componentes de válvulas. |
| Panos limpos | Para secar e limpar a válvula. |
| Óculos de segurança | Protege os olhos contra respingos de água e detritos. |
| Luvas impermeáveis | Mantém as mãos secas e melhora a aderência. |
| Cordão de vedação de PTFE | O novo material utilizado para criar a vedação. |
| Óleo Penetrante | Ajuda a soltar porcas emperradas ou corroídas. |
Para escolher o reparo correto, você precisa descobrir exatamente de onde vem a água. válvula de gaveta Possui várias partes: a alça, a haste à qual ela se conecta, a porca de vedação abaixo da alça, a porca maior da tampa e o corpo principal da válvula.
Primeiro, use um pano limpo e seco para secar toda a válvula. Observe atentamente por alguns instantes. O primeiro ponto onde uma nova gota de água aparecer indica a origem do vazamento.
O vazamento mais comum é a infiltração de água no ponto de entrada da haste metálica na porca de vedação. Também é o mais fácil de consertar.
Isso acontece quando o material de vedação dentro da porca se desgasta, resseca ou se solta com o tempo. Esse material forma uma vedação ao redor da haste.
Um vazamento na junção onde a parte superior da válvula é rosqueada no corpo principal é mais grave.
Isso significa que a junta ou vedação do capô falhou. Às vezes, é possível consertar desmontando a válvula. Mas, frequentemente, significa que a válvula é antiga e está perto do fim de sua vida útil.
Se você notar um gotejamento constante na parte inferior da válvula ou uma rachadura no corpo de latão, a válvula não poderá ser reparada.
Essa é uma falha crítica. Ela resulta de corrosão severa, danos causados pelo congelamento ou um defeito no metal. Uma válvula como essa precisa ser substituída imediatamente para evitar que se rompa.
Depois de localizar o vazamento, você pode iniciar o reparo adequado. Começaremos com a solução mais simples e, em seguida, passaremos para a solução mais completa para vazamentos na haste. Lembre-se: o registro de água deve ser fechado para o Método 2.
Para pequenos vazamentos na haste da válvula, tente primeiro apertar a porca de vedação. Essa simples medida costuma comprimir a vedação antiga o suficiente para vedá-la novamente.
Dica profissional: Sinta a tensão
Gire a porca apenas de 1/8 a 1/4 de volta por vez. A pressão necessária é suficiente para estancar o gotejamento. Apertar demais pode impedir o giro da alavanca da válvula e até danificar a haste, agravando o problema. A chave deve girar com firmeza, sem força excessiva.
Se o aperto não funcionar ou o vazamento for grande, o material de vedação está gasto e precisa ser substituído. Isso cria uma vedação completamente nova.
Dica profissional: Seja minucioso e delicado.
A vedação antiga provavelmente será um anel duro e quebradiço ou um material fibroso e comprimido. Com cuidado, retire-a pedaço por pedaço. Tenha paciência. Certifique-se de remover tudo. Não risque a superfície polida da haste de latão da válvula. Arranhões profundos podem criar um novo caminho para vazamento de água.
Às vezes, o reparo da válvula de gaveta não é a solução mais prática a longo prazo. Saber quando optar pela substituição em vez do reparo economiza tempo, dinheiro e evita dores de cabeça futuras.
Isso exige olhar além do vazamento imediato. É preciso avaliar a condição geral e a idade da válvula.
A maioria das válvulas de gaveta residenciais são de latão ou bronze, com uma vida útil típica de 10 a 20 anos. Essa vida útil pode ser menor em áreas com água muito dura ou com composição química agressiva. Essas condições aceleram a corrosão e a formação de incrustações.
Utilize esta matriz de decisão para ajudá-lo(a) a fazer a melhor escolha.
| Sintoma/Condição | Recomendação | Raciocínio |
|---|---|---|
| Vazamento pela haste (sob a alça) | Reparar | Este é o ponto de falha mais comum e pode ser facilmente corrigido com uma nova gaxeta a um custo muito baixo. |
| A válvula é muito antiga (mais de 15 anos) e está corroída. | Substituir | É provável que o metal esteja fatigado. Corrigir um vazamento pode apenas preceder outra falha, como uma comporta emperrada ou uma rachadura na carroceria. |
| Rachadura visível no corpo da válvula | Substitua imediatamente | Trata-se de uma falha estrutural irreparável. A válvula apresenta alto risco de rompimento e consequente inundação de grandes proporções. |
| A válvula não fecha completamente (está passando água). | Substituir | A comporta ou sede interna está danificada, deformada ou obstruída por incrustações minerais. O reparo não pode ser feito sem ferramentas especializadas e não é economicamente viável. |
| A alça está quebrada ou a haste está espanada. | Substituir | Encontrar alavancas ou hastes de substituição exatamente iguais para válvulas antigas é difícil e, muitas vezes, custa quase o mesmo que uma válvula nova. |
Se o seu diagnóstico ou a matriz de decisão apontar para a substituição, você estará entrando em um trabalho de encanamento mais complexo. Isso envolve a remoção completa da válvula antiga e a instalação de uma nova.
É um projeto "faça você mesmo" administrável para quem tem alguma experiência. Mas proceda com cautela.
Segue uma visão geral das etapas:
AVISO IMPORTANTE
Se você não se sentir totalmente confortável com esse processo, se os canos forem antigos e parecerem frágeis, ou se a válvula estiver soldada, recomendamos fortemente que você chame um encanador licenciado. O custo de um profissional é muito menor do que o custo de consertar um cano quebrado dentro da parede.
Seguindo esses passos, você resolveu com sucesso um dos problemas de encanamento mais comuns. Um reparo bem-sucedido em uma válvula de gaveta não só estanca o vazamento, como também lhe dá confiança para lidar com futuras tarefas de manutenção doméstica.
Você aprendeu as lições mais importantes para qualquer trabalho de encanamento.
Parabéns por ter restaurado o bom funcionamento do seu sistema hidráulico e por ter recuperado a sua tranquilidade. A manutenção preventiva como esta é a melhor forma de garantir um sistema sem problemas por muitos anos.
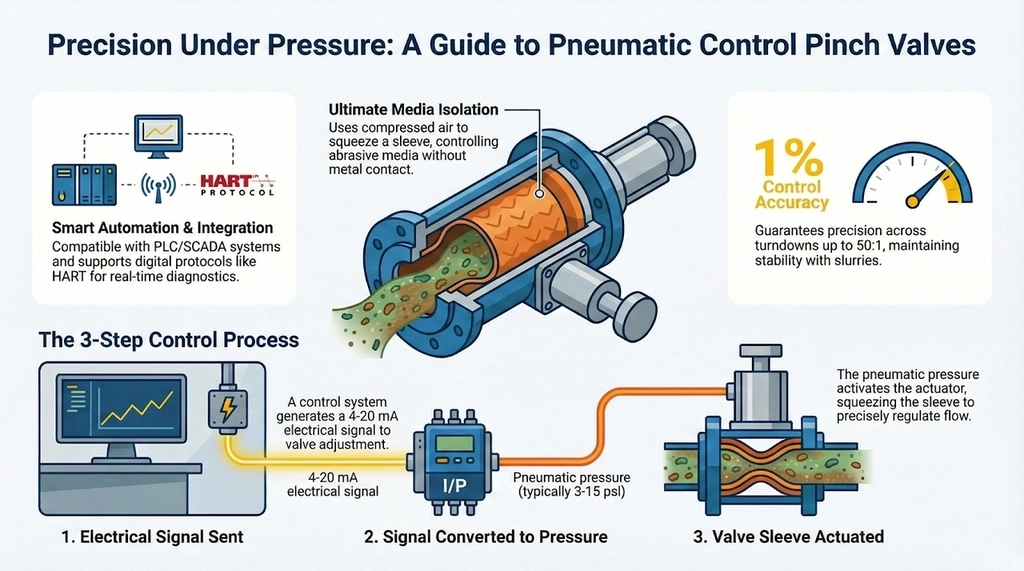
Industrial automation systems require valves that deliver precise flow control without compromising reliability in corrosive or abrasive media. A pneumatic control pinch valve excels as a modulating control valve, enabling precise flow to control pressure, temperature, or fluid levels. Using compressed air to gradually adjust the valve position allows smooth process control in mining, wastewater, […]
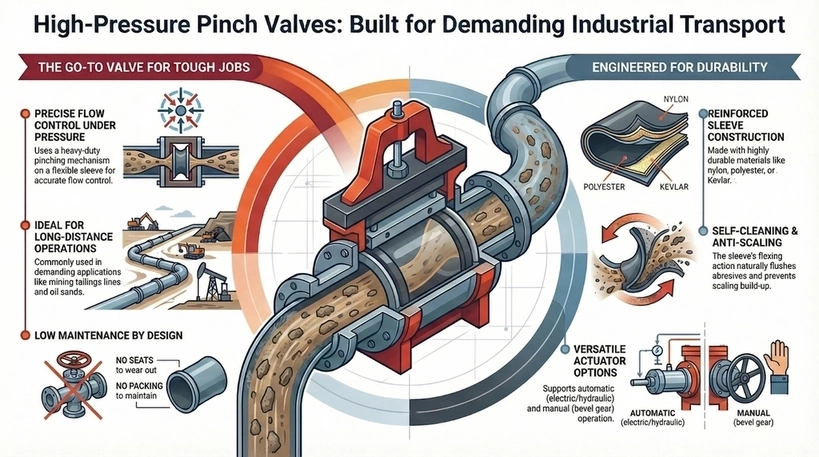
High pressure pinch valves, like PN16 pinch valve and class 150 pinch valve designs, involve a rugged and heavy-duty pinching mechanism in positioning the sleeve, resulting in an almost accurate and measurable flow of media. This kind of valve is popular and commonly used for long distance operations in mining tailings lines or oil sands, […]

Understanding pinch valve dimensions and flanges ensures seamless integration into piping systems, particularly when choosing between DIN vs ANSI. The two are different but commonly used standards by organizations in engineering, manufacturing, and product design. DIN was developed in Germany but widely adopted across Europe and parts of Asia. Meanwhile, ANSI standards, which originate from […]

Selecting the appropriate explosion proof valve is essential for safety in industries that pose explosion risks. ATEX certified valves guarantee compliance with European standards, preventing ignition sources from heat, sparks, or static electricity. This blog explores key factors for choosing ATEX certified explosion proof valves that ensure overall operational safety, highlighting the entailed regulations and […]